VGS and LVS on HPUX
MANUAL FOR THE CREATION OF VGS
Content:
Section 1 : Creation of VGS (Volum Group)
Section 2 : Creation of LV and its format.
Section 3 : Assembling the Filesystem.
Section 4 : LV HP-UX Extender
Section 5 : VGS Extension (Considerations and Dimensioning)
Section 6 : Export VG (Considerations and Dimensioning)
Section 7 : Import VG
section 8: destruction of vg.
section 9: Manuals (Consultations).
Previous considerations:
Before modifying anything, it is advisable to save the following information:
- Section 1
============================================================
powermt display -----> you see the disks that exist and save this information

powermt display dev=all -----> you see the complete disks and save this information

insf -C disk
============================================================
The first steps are the recognition of the discs or the disk and then that recognized by the operating system.
ioscan -fnC disk ---> Scanning the presented disks
insf -e -C disk ---> Reinstall all disks / recognize new ones
Note: if you do not recognize them, you must put the option “-e”.
Thus : insf -e -C disk
powermt ---> display you see the disks that exist
powermt config ---> configure and in theory take the new disks
powermt save ---> save powermt settings

powermt check ---> to delete paths / if necessary
===================================================================
NOW WE PROCEED TO THE FIRST AND MOST IMPORTANT STEP
pvcreate -f /dev/rdsk/c36txx ——> The physical disk is created (disk formatting), replace “c36t0d1” with the corresponding disk.
NOTE: If you do not create the pvcreate and then try to use the disk in an LVM volume group, it will return the error: “Physical volume contains no LVM information”, so use the -f option to force it.
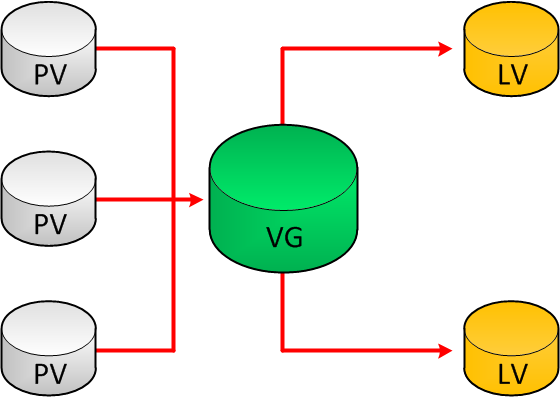
Creation of the VG (Volume group)
The main thing is to create the directory where our VG will be supported. Which is created in “/dev”
mkdir /dev/vgpabc
Now an important step is to check in minor number according to the history. to follow the correct sequence and not place duplicates.
| ls -l /dev/vg*/group | sort -k6b |
Output:
- crw-r—– 1 root sys 64 0x000000 May 6 2015 /dev/vg987/group
- crw-r–r– 1 root sys 64 0x010000 Jul 6 2015 /dev/vggatos/group
- crw-r–r– 1 root sys 64 0x020000 Jul 20 2015 /dev/vgdatos/group
- crw-r–r– 1 root sys 64 0x030000 Jan 18 11:15 /dev/vgcde/group
After knowing the minors numbers we must create the mknod. Remember that : “mknod” is the way to create device files that are not present.
The command is:
mknod /dev/vgcantv/group c 64 0x040000
For the previous example we have “0x030000” and if we follow the order it should be: 0x040000
============================================================
Once this is finished we will proceed to create the vg itself.
vgcreate -p 255 -s 256 /dev/vgprueva /dev/dsk/c36xx /dev/dsk/c28xxx -----> we create the vg with the disk paths.
(256 depends on the size of the disk) And 255 is the maximum number of disks supported by the VG.
============================================================
We verify their existence:
vgdisplay -v /dev/vgabc---------------> to know if the vg.
============================================================
- Section 2
Now an important part is to create the LVs like this:
Considerations for creating the LV :
If it is created with a lowercase “l” it is space allocation per block and it is calculated differently
If “L” is a capital letter, it is assigned by megabytes
Example with a small “l” :
10000 * 2600 / 83000
| Space to be assigned | Free PE | Total size of the VG | |:——–|:——-:|——–:| | ????? | 2600 | PE size * Total PE |
Translation: What I want * Free PE / Toal size (= PE size * Total PE) The resultant number is the amount of blocks that will be assigned remaining:
lvcreate -l 320 -n lvcantv vgasdf ------> The lv is created
A GIGA is the example below (note the capital “L”).
lvcreate -L 102400 -n lvabc vgasdf ------> The lv.
============================================================
Format of the Lv’s at raw level
newfs -F vxfs -b 8192 -o largefiles /dev/vgasdf/rlvasdf
note: the -b 8192 is a standard and the -o largefiles option is for you to work with files larger than 2GB (or large files).
Once the raw lv is formatted, we proceed to create the mount point or filesystem as such
mkdir /oracle/QA2/asdfghjkl —–> This is what the mounting point will be called. This is the name requested by the customer specified in the requirement.
============================================================
- Section 3
The last step is to mount the FS on the route or mount point
mount /dev/vgabc/lvcantv /Lvabcd ——> Mounts on filesystem.
Note: The above step is the manual mount, but you must leave it specified in the fstab so that when you run a mount -a you mount all the FS.
- Section 4
============================================================
MANUAL TO EXTEND LV IN HP-UX
Previous considerations:
Before modifying anything, it is advisable to save the following information:
WARNING: Remove the filesystem or the filesystem associated to the lv
============================================================
vgdisplay -v "namevg" ----> See the vg that will be extended
NOTE: before extending the lv it will be verified if the vg has space available with:
Available size VG = Free PE * PE size Total size VG = PE size * Total PE
============================================================
IMPORTANT: BEFORE EXECUTING THE UPDATE WITH “lvextend” BEAR IN MIND
* Check the route very well.
* MAKE THE SIZE OF THE FILESYSTEM + THE NEW TO ASSIGN example : if it has 1000 and we want to add 13336, it will be 14336


  lvextend -L 14336 /dev/vgabc/LVabc -----> Extend the file system with the requested space + the one you want to extend at once
NOTE: In this case the space to be extended is 14Gigas apox.
============================================================
Now an important step in the extension of LVs is that we must update the changes for it :
fsadm -F vxfs -b 14336M /dev/vgcantv/lvtest ——> update or refresh the filesystem extension
Also note the letter “M” in capital letters at the end (Megs)
- Section 5
EXTEND VG IN HP-UX
============================================================
Previous considerations:
BEFORE ANYTHING VERIFIES THAT THE SIZE OF THE DISK IS CONSONOUS WITH THOSE WHO SUPPORT THE VG with DISKINFO AND THE DISK IF THAT IS NOT DONE WE COULD LOSE DISK SPACE
============================================================
We run :
diskinfo /dev/rdsk/c8t1d6
and throw :
SCSI describes of /dev/rdsk/c8t1d6:
             vendor: EMC
         product id: SYMMETRIX
               type: direct access
               size: 85564800 Kbytes
   bytes per sector: 512
Once this is done, we must start with the format of the disk and print the LVM label on it:
pvcreate /dev/rdsk/c8t3d0
============================================================
then if it is added to the vg with the command :
vgextend vgabc /dev/dsk/c8t3d0
============================================================
- Section 6
MANUAL EXPORT VGS IN HP-UX
Previous considerations:
Before modifying anything, it is advisable to save the following information:
cat /etc/fstab > /tmp/will/fstabclokiuj.txt
============================================================
First we can check if the vg exists and if there are users who are using the FS.
fuser -u /vgabc ----> check if there are users using the filesystem.
Then see the name of the vg:
vgdisplay -v normbrevg
============================================================
Now if we proceed to export the VG:
NOTE: It is very important that if we are going to execute the command vgexport we use the option “-p”.
vgexport -p -v -s -m /tmp/vgrespaldo.map vgcantv
NOTE: Remember that the order of the options is important and that the name of the .map must be the same as the name of the vg.
============================================================
- Section 7
IMPORT VGS IN HP-UX
Check whether or not the vg is with :
Vgdisplay -v vgname
============================================================
Then create the folder/directory in /dev with the correct name (name of the vg )
Example :
mkdir /dev/vgabc
Once the folder is created, we consult in minor mumber with:
ls -l /dev/vg*/group | sort -k6b
and throw this away:
- crw-r—– 1 root sys 64 0x000000 May 6 2015 /dev/vg00/group
- crw-r–r– 1 root sys 64 0x010000 Jul 6 2015 /dev/vgapp/group
- crw-r–r– 1 root sys 64 0x020000 Jul 20 2015 /dev/vgdatos/group
- crw-r–r– 1 root sys 64 0x040000 Jan 16 11:35 /dev/vgruben/group
and we must continue the sequence (0x050000) and now if we use the command :
mknod /dev/vgtest/group c 64 0x050000
“mknod” is the way to create device files that are not present
============================================================
Once the previous steps have been carried out, the map is imported (vgname.map) with:
vgimport -v -s -m /tmp/vgprueba.map vgprueba
============================================================
Once finished we must activate it since it is inactive and is done with:
vgchange -a and vgtest
============================================================
we check them with:
vgdisplay -v vgname
============================================================
Now it would only remain to mount the corresponding fs in the corresponding mounting points or according to the requirement Con:
mount /dev/vgtest/lvtest /bd
remembering that the “/bd” is the mounting point of the lv
============================================================
- Section 7
DESTROY VG AT HP-UX
To destroy it we simply dismantle the FS and deactivate the vg with:
vgcahnge -a n vgname
============================================================
then if we proceed to remove it:
vgexport -v vgname
============================================================
Note: BEFORE DOING ALL THIS, BACKING UP IN CASE WE MISSED (Section #6 Steps)